Salesforce gives you a lot of flexibility. At times you need pointers to customize your App the way you imagined. One such example is customizing the layout of a new record page. When creating a new record, the fields are laid out similar to the Lightning Record Page for the object. While your LRP may be great for viewing an existing record, encouraging users to explore related records or relevant business tasks, it may be overwhelming when creating a new record. Let’s say you want to streamline the experience for creating a new account and only want users to see two fields: Name and Description. I’ll show you exactly how to accomplish that.
Prerequisite: You’ll need a “dummy”-record for the object whose new record page you’re customizing. In this example, we’ll customize the new record page for Accounts, and perhaps you’ve already set up an Account representing your company. If you haven’t, now’s time to do so. Once you have the record, take note of its Id. We’ll go with 001XX0000000000000 for this example.
Create an Action
- Go to Setup > Object Manager > Account > Buttons, Links, and Actions
- Click New Action
- Enter Action Information:
- Object Name: Account
- Action Type: Create a Record
- Target Object: Account
- Label: Add New Account
- Name: (populates with Add_New_Account when you click into field)
- Create Feed Item: Unchecked
- Save
- You are taken to the page layout screen. Make the following changes:
- Remove Phone, Industry, Type, and Website fields
- Add the Description field
- Save
You’ve created a New Action. To get this working the way we intend to, we need to reference this action in a button.
Create a New Button
- Go to Setup > Object Manager > Account > Buttons, Links, and Actions
- Click New Button or Link
- Enter New Button or Link Information:
- Label: Add New Account
- Name: (populates with Add_New_Account when you click into field)
- Display Type: List Button
- Display Checkboxes: Unchecked
- Behavior: Display in existing window with sidebar
- Content Source: URL
- Formula:
{!URLFOR('/lightning/action/quick/Account.Add_New_Account?objectApiName&context=RECORD_DETAIL&recordId=001XX0000000000000')}
Don’t forget to replace the action name and dummy record id. Note the dummy record is not used in any way with this button but it’s a requirement. - Save
Remove Standard New Record Button and Place Custom New Record Button onto Object List View
- Go to Setup > Object Manager > Account > List View Button Layout
- Edit List View
- Uncheck Standard Button > New
- In the Custom Buttons section, place Add New Account onto the Selected Buttons list
- Save
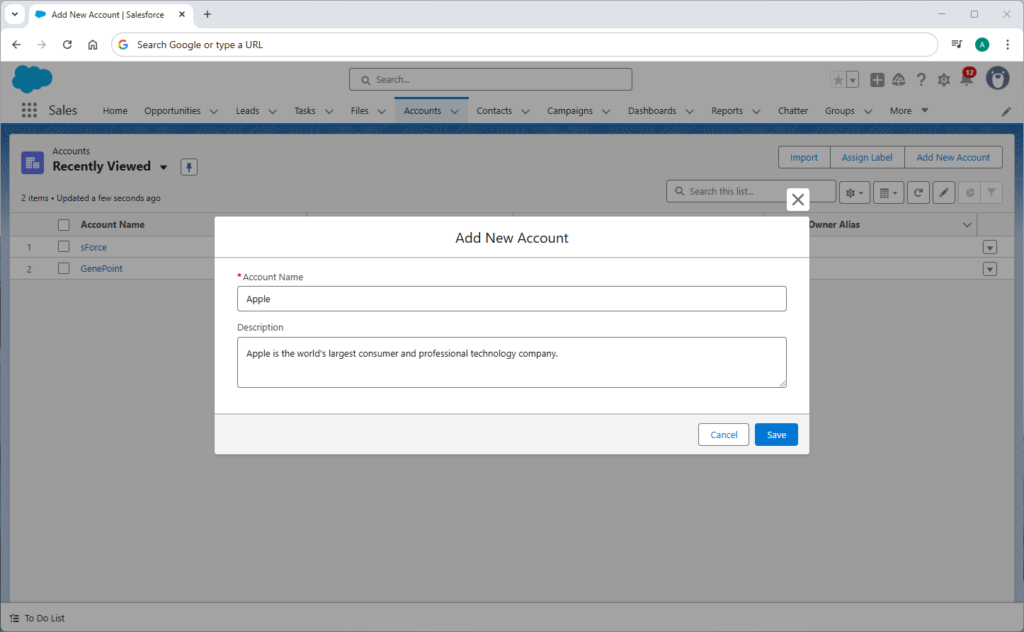
Test it out
- Go to Accounts tab and refresh it
- Click Add New Account
- Note that only Account Name and Description is visible
- Provide an Account Name and Description
- Save
All set. The new record is created and populated with just the Account Name and Description. You can adapt the above set of steps for any standard or custom object.
Reference:
Many thanks to Shivam Vishwakarma whose Medium article is the reason I learned the above.